Ingredients
- 300g short grain sushi rice
- 425mL strong Thé Paon butterfly pea tea (cold)
- 150mL sushi vinegar
- 20g salt
- 90g sugar
- 8 sheets of nori (seaweed)
- Fillings : tuna, teriyaki chicken, salmon, avocado, egg omelette, cucumber strips, capsicum strips, carrot strips
- To serve : wasabi paste, light soy sauce or tamari, pickled ginger
Method
Rinse the rice under water until the water runs clear (or at least much less cloudy). If there’s too much starch, your sushi rice will be more sticky than intended – you want the cooked rice to stick to one another while still being individual grains. Don’t worry if your rice isn’t perfect, sushi rolls can hide a multitude of mistakes, and it can take sushi masters years to master the perfect rice! Here’s a couple of tips to help you out.
After washing the rice, tip it into a pot. Add the cold butterfly pea tea, cover, and let the rice sit for 30 minutes.
While the rice sits, prepare the rice seasoning. To a small pot add the sushi vinegar, salt, and sugar. Heat the mixture while gently stirring just until the salt and sugar have completely dissolved. Set to the side.
Bring the rice up to a boil using a medium heat, then turn down to a gentle heat and cook for 15 minutes. Turn off the heat, cover, and let the rice absorb the remainder of the water. Note, each type of short grain rice can have different cooking times – add a little boiling water to the pot if your rice is still undercooked after 15 minutes and let it absorb further.
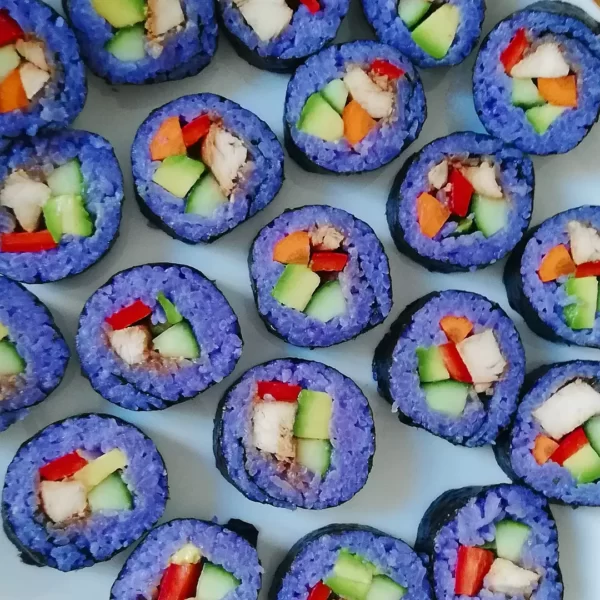
Your rice should be a nice blue, and the intensity of the colour will depend on the strength of the butterfly pea tea that you prepared. Don’t get attached to the blue… it will change to a lovely purple on addition of the rice seasoning. This is because the seasoning contains vinegar, which promotes an acidic environment. At a low pH (acidic) the blue antioxidants in the rice to become a mixture of blue and red forms. These antioxidants, called anthocyanins, are heat-stable and still retain their anti-inflammatory properties regardless of their colour.
Spread you rice our on a large tray so that it cools down faster, and sprinkle over the rice seasoning. Mix gently with a wooden spoon, or something similar – but avoid metal utensils that may break the rice.
While the rice is cooling, prepare your sushi fillings. Cut them into strips so that you can lay them out more easily.

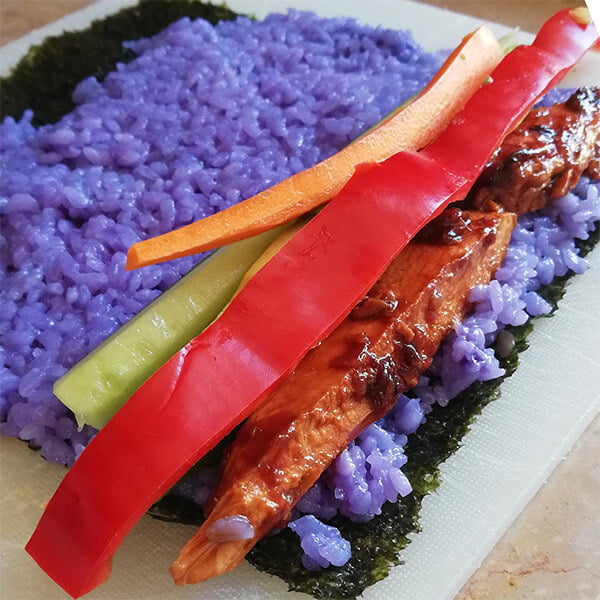
To make your first roll, place a sheet of dried seaweed down first, rough side up. Sprinkle a layer of seasoned rice down next and spread out gently using your fingertips – avoid mushing the rice down. Leave a few centimetres at the top of the roll. This space will be used to seal the sushi.
Next, add whatever fillings you like onto one side of the seasoned rice (as in the photo). Don’t put too much into the roll, it will make it difficult to roll up.
Roll the seaweed over the ingredients to form a roll, making sure to apply even pressure along the length. Wet a finger with water and moisten the top few centimetres that were left free of rice. Roll up the sushi roll tightly, and seal the moistened section of the seaweed to the roll. Place into the fridge seaweed seam facing down so that the sushi roll cools slightly, it will make it easier to cut.
Cut into even slices with a sharp knife. If a sharp knife is not available, a good tip is to wet the blade of your knife with a little water so that the rice doesn’t stick.
Serve with soy sauce/tamari, a dollop of wasabi, and some pickled ginger slices.
Butterfly pea sushi – packed with extra antioxidants!


